eSIM Identity & Device Migration
Binding telecom identity to cryptographic authority.
Overview
In this model:
- A Web2 account is linked to a wallet address.
- That wallet address is bound to an eSIM (eSIM A).
- The eSIM acts as a continuity signal across devices.
- Device verification is performed using signed messages — not shared secrets.
This allows:
- Strong fraud prevention
- Device-based identity
- Secure migration
- No reliance on passwords
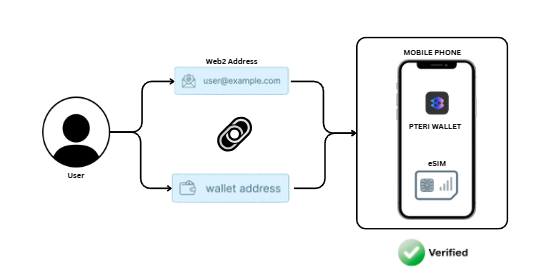
WORKING OF eSIM
Flowchart 1 — How the eSIM Verification Works
Initial Setup
Step 1 — Account Binding
- User has a Web2 account.
- That account is linked to a wallet address.
- The wallet is associated with eSIM A.
Result:
Web2 Account → Wallet Address → eSIM A
Step 2 — Authentication Request
On a mobile phone with:
- PTERI Wallet installed
- eSIM A active
The phone initiates an authentication request.
Instead of generating a normal OTP, the device:
- Signs a message using the wallet’s private key.
- Generates an OTP derived from that signed message.
- Sends the signed payload to the server.
Step 3 — Server Verification
The server:
- Receives the signed message
- Verifies the signature using the wallet address
- Confirms the wallet matches the Web2 account
- Confirms eSIM binding
If valid:
- The device becomes a VERIFIED PHONE
- Future authentication can use the same signature-based OTP mechanism
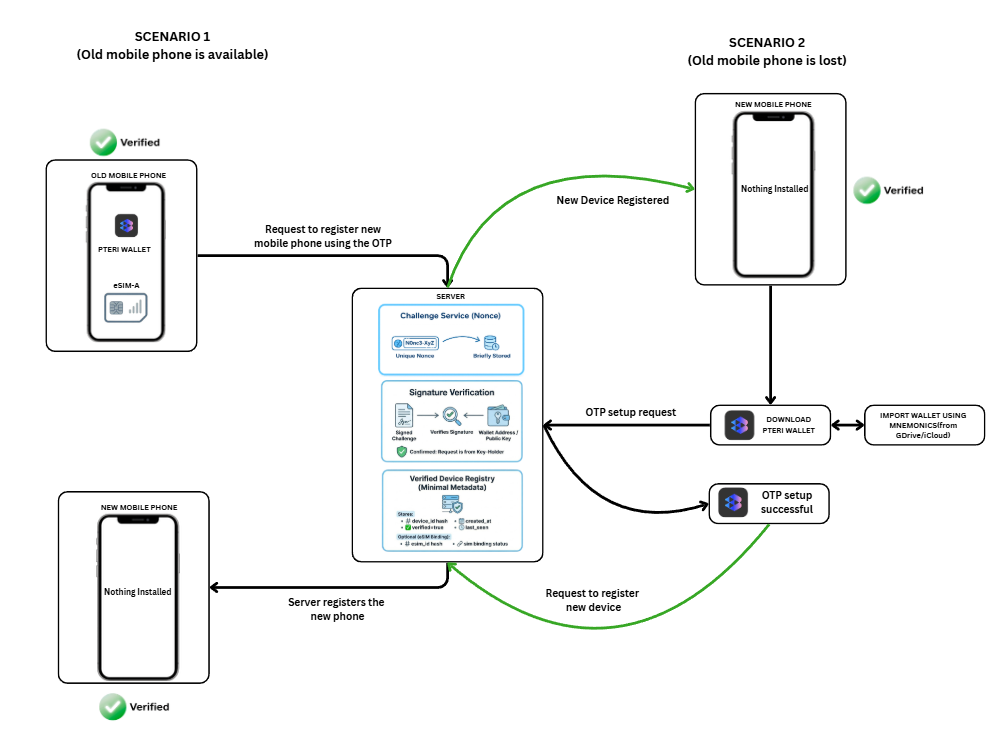
SOLUTION TO FRAUD & DEVICE MIGRATION
Flowchart 2 — Fraud Prevention & Device Migration
This section describes two migration scenarios.
Scenario 1 — Old Device Available
You have:
- Old Mobile Phone (Verified + eSIM A)
- New Mobile Phone (Unverified)
Step 1 — Initiate Registration
On the old verified device:
- User requests to register new device.
- Device signs a migration message using its wallet.
- Server receives the signed request.
Step 2 — Server Validation
Server verifies:
- Signature matches wallet
- Wallet matches Web2 account
- Request originates from a verified device
Step 3 — Register New Device
Server:
- Registers the new device
- Marks it as verified
- Optionally revokes the old device (if requested)
Result:
New Mobile Phone → VERIFIED
No passwords.
No SMS.
No shared secrets.
Scenario 2 — Old Device Lost
You have:
- Only a New Mobile Phone
Step 1 — Install PTERI Wallet
User downloads the PTERI Wallet on the new device.
Step 2 — Import Wallet
User imports wallet using:
- Mnemonics (manual backup)
- Or encrypted backup (iCloud / Drive, if enabled)
This restores wallet authority locally.
Step 3 — Identity Authentication
The wallet:
- Signs an authentication message
- Sends it to the server
- Proves control of the wallet
Server verifies signature.
Step 4 — Re-establish OTP
The wallet re-initializes the signature-based OTP mechanism.
Step 5 — Register New Device
Wallet sends a signed registration request.
Server:
- Validates signature
- Confirms wallet continuity
- Registers new device
- Marks device as VERIFIED
Migration complete.
Why This Prevents Fraud
This system eliminates:
- SIM-swap-only attacks
- OTP interception
- Shared-secret replay
- Password resets
- Phishing-based takeover
Because:
- Authority always requires wallet signature
- OTP is derived from signed message
- Server never trusts telecom signals alone
- eSIM acts as continuity signal — not sole authority
Security Model Summary
| Layer | Purpose |
|---|---|
| Wallet Signature | Proves authority |
| eSIM Binding | Proves continuity |
| Server Verification | Enforces policy |
| Litecoin | Provides deterministic verification & optional block anchoring |
No single layer can take over the system.
Design Principles
- No private keys stored on server
- No plaintext mnemonics transmitted
- No reliance on SMS OTP
- Device authority is always cryptographic
- Migration requires explicit proof of wallet control
Why This Model Matters
This approach bridges:
- Web2 identity systems
- Telecom infrastructure
- Decentralized cryptographic authority
It allows enterprises to:
- Upgrade security without replacing Web2 accounts
- Prevent SIM-swap fraud
- Enable seamless device migration
- Maintain non-custodial control